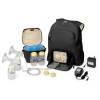
 The Medela Pump in Style is a great investment for breastfeeding mother’s who plan to continue to offer breast milk to their baby once they return to work. This breast pump is easy to use and is the most popular Medela pump. The pump is easy to use and assemble. Learn how to properly assemble and use the Medela Pump in Style.
Disclosure: This post is for informational purposes only. This post may contain affiliate links.
Learn the Names of the Breast Pump Parts
1. Membrane – The membrane is a small white rubbery flap that attaches to the valves. The purpose of this piece is to create suction to pull milk from the breast. As the milk flows, the flap will move back and forth. If this piece is torn or damaged, it will cause the breast pump to lose its suction. Always keep extra membranes handy.
2. Valves – The valve is a small round piece that is flat with holes on one side. This piece attaches to the breast shield and the membrane attaches to the side with the holes. The valves are somewhat delicate and can be broken. The bottom of the valve may crack or break, if it does, you will need to replace this immediately. A cracked valve will decrease the suction. Always keep an extra set handy.
3. Breast Shield – Medela has recently switched to a breast shield that is all one piece. They designed the breast shield to prevent breast milk from backing up into the tubing. If you have the older breast shield, you will have two pieces a connector and the funnel piece. The funnel slides into the connector. The valve attaches to the bottom of the connector or bottom of the one piece breast shield.
4. Tubing – The tubing attaches to the breast shields and to the face plate on the breast pump.
5. Bottle – The bottles screw onto the bottle of the breast shield. They can also be used to store breast milk in until you are ready to use it or you can transfer the milk into storage bags.